In this post we will go through the basic concept of the Docker Swarm and have some hands on experience of deploying application on Docker Swarm. You need to have basic knowledge about Containers to follow this post. Here, an article that describe the basic of the Docker Container.
Having only single container for each service is not good when it comes to the production environment since we also need high availability when one node is down. If one node is down, then there should be another node to take over the load to that particular service. Docker Swarm gives you an elegant way to handle multiple container. Docker Swarm control following functionalities for you to deploy containers easily.
- Health Checks on the Containers
- Launching a fixed set of Containers for a particular Docker image
- Scaling the number of Containers up and down depending on the load
- Performing rolling update of software across containers

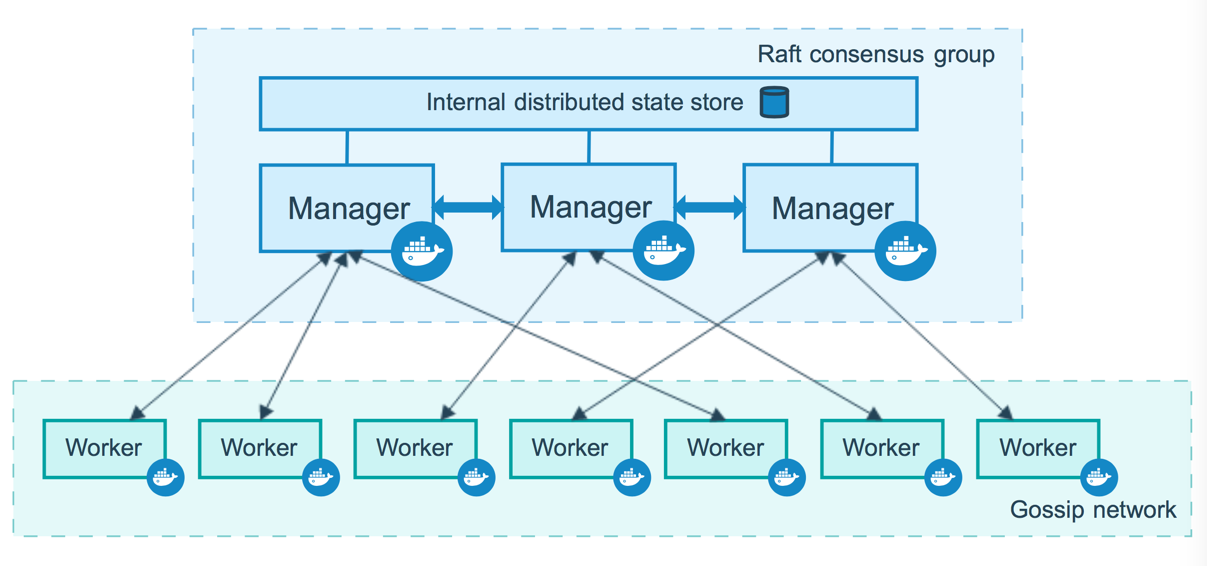
A Node is an instance of the Docker engine participating in the swarm.
Worker Node are the nodes that run containers as instructed by the Master Node.
Manager Node instruct Worker Node container status. In Docker Swarm, there can be multiple manger and worker nodes. Purpose of having multiple manger node is to maintain high availability for Manager nodes. Here, one node selected as the Leader Node which perform the container orchestration. Leader Node selected by the the algorithm know as Raft consensus algorithm. handle the Manager Node can be also act as Worker Node by default. Manager node responsible to do following tasks.
- maintaining cluster state
- scheduling services
- serving swarm mode HTTP API endpoints
For this example I am using Play With Docker instance to deploy the swarm instead of testing it on local machine. You can create an account in https://labs.play-with-docker.com with your docker hub credentials (You can test it in your local machine as well. But I prefer this one since you don’t need to install Docker). Once you logged in, you can create new instance with “Add New Instance” button in the top left corner. This will show you a terminal that can be tested our deployment.
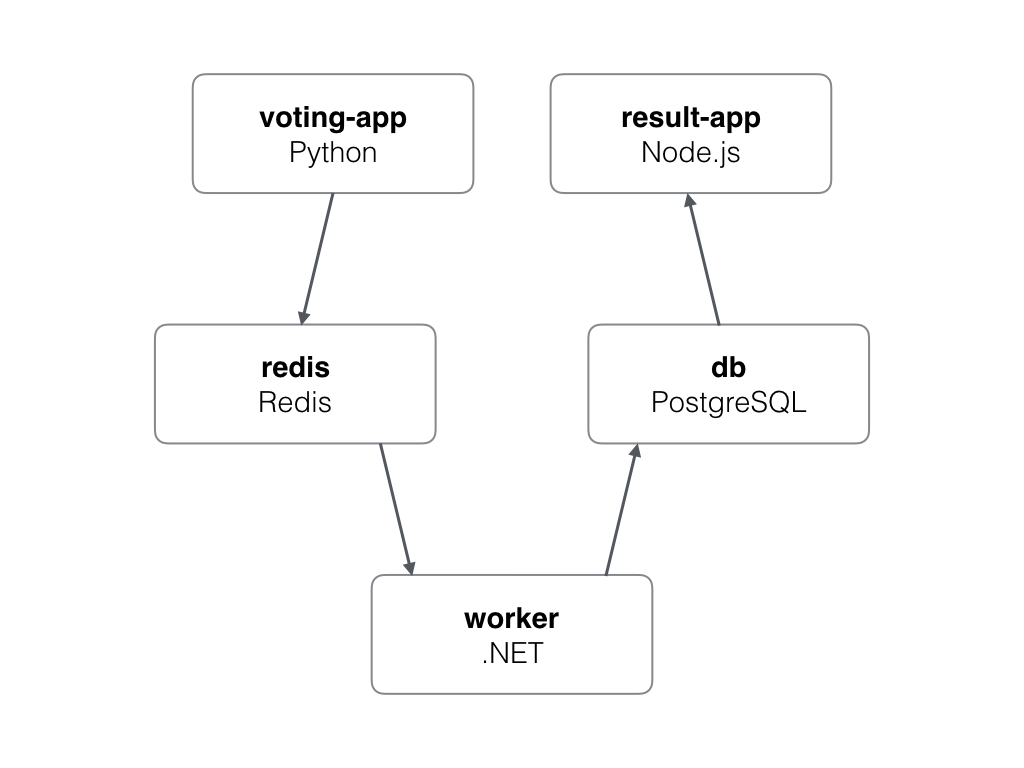
For this example we are using sample code from the Github that contain all required coding implementation. This example contain five different services as describe below.
- Voting-app This is a python server that provide interface to vote. Port set to 5000 to access the interface. Vote app send vote results into the Redis DB.
- Redis Redis is a on memory key value database that used here to store vote data.
- Worker Worker read vote data from the Redis DB and save it on PostgreSQL DB
- PostgreSQL This database store vote data in database
- result-app This is NodeJS application to publish the voting result over the port 5001
 First you need to clone this Github repository into the newly created instant with following command.
git clone https://github.com/dockersamples/example-voting-app
Then move into the project folder with
cd example-voting-app
Next, start the application with Docker Swarm with following command.
docker swarm init
This command will generate all required Docker images from “/result” “/work” “/worker” by executing “Dockerfile” and start the docker swarm.
Once everything setting up, you can see few port numbers are showing on top of your webpage. Click on 5000 port to see the interface to put vote and click on 5001 port to see the results of the vote.
Hope you enjoy reading this article and see you in next article. Cheers :)

) Introduction to The Docker Life Cycle
Introduction to The Docker Life Cycle